| Created by: | Ari Novikoff, MCPS Senior Pre-Sales Engineer Macrium Software |
IMPORTANT ASSUMPTIONS AND NOTES
- You are using this DHCP server in a closed testing / deployment environment. Please do NOT do this in a live production environment without the necessary clearance / permission / authority / licensing to do so.
- You are a network administrator and have domain administrator access or permission to use a Windows Server / Server license for this project.
- You are a network administrator and have the appropriate authority / permission to complete this project.
- You understand how to, are licensed to, and have created the Technician’s USB stick from your Deployment Kit for use further on in this document.
- You have the proper Microsoft licensing to use the Deployment Kit for the purpose of this project.
- This server will be both a DHCP and WDS server for this closed environment.
- Macrium Software, its parent company Paramount Software UK Ltd, its affiliates and/or employees are not liable under any circumstances for issues arising directly or indirectly from the use of this document.
If the above assumptions and notes above do not pertain to your environment, license compliance, and/or permission, and/or if you do not agree with the assumptions and notes above, then please DO NOT proceed. Your use of this document is subject to and constitutes your acceptance of the above and is done so completely at your own risk.
Install and configure the DHCP Role on Windows Server 2016/2019/2022
- Open Server Manager and select the local server.
- Click on “Manage, then select “Add Roles and Features”

- Select “Role-based or feature-based installation”. Click “Next”

- Select the destination server. Click “Next”

- Select “DHCP Server” from the Roles list. Click “Next”.

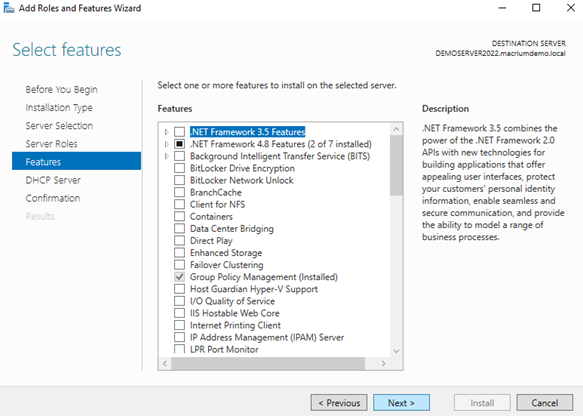
- Confirm the features that are required. Click “Add Features”, then click “Next”.

- Click “Next” on the Features list.
- Read through the notes for DHCP Server and click “Next”.

- One last chance to make changes, confirm and by clicking “Install”.

- Wait for the installation to complete and click “Close”.

- In the search bar, type “DHCP” and click on the app when it comes up.

- Now we begin the process of configuring DHCP. Expand the server and right click on IPv4. Click on “New Scope”.

- Click “Next” to start configuring the new scope.

- Give your scope a name and description. We’ve chosen “MacriumDemo IPv4 DHCP Scope” in our example. Click “Next” when done.

Enter a start and end address for your DHCP range. Decide on how many addresses you need by adjusting your subnet mask accordingly. Click “Next” when done.
Note: We will setup exclusions in the next section.
If you need to add some exclusions (like the static address of the DHCP / WDS server), you can add exclusion ranges here. Click “Next” when done.

If you need to adjust the DHCP lease duration, make your adjustment here. Click “Next” when done.

If you want to define DHCP options for the scope, select “yes” here. Otherwise, select “no”. Click “Next” when done.

If you’ve selected “yes” above, you’ll be asked to enter a few common options. First is router. Enter your router’s IP address (if there is one). Click “Next” when done.

The next option will be DNS. Enter your FQDN or IP address for DNS servers you want to reference (if any). Click “Next” when done.

You’ll be asked to enter WINS server info. If you have a WINS server you need to define here, enter the information. Click “Next” when done.

There is still a piece missing that we’ll need to define, so for now, do not activate the scope. Select “No, I will activate this scope later”. Click “Next” when done.

Click “Finish” to complete the Scope Wizard.

If you are configuring DHCP before WDS, you can activate the scope now. WDS will automatically add option 60 to the Server Options when you’ve completed the WDS configuration.
If you are configuring DHCP after WDS, please check to make sure that option 60 has been added in to the Server Options section. If not, please reboot your server and then activate the scope.
To activate the scope right click on the scope and select “Activate”.

You can verify all options in the information pane.

DHCP is now configured. If you’ve already set up WDS, then you should be able to start up a PXE compatible system, have it boot up, talk to the PXE sever, get the Deployment Kit Recovery Environment boot image (defined in the WDS document), and be ready for imaging.
