The Rescue Media Wizard
- Insert your blank CD, DVD or USB stick.
From the Backup tab of the task pane, below Other Tasks, click Create bootable Rescue media.

- Accept the default Windows PE environment selected by Macrium Reflect or Click 'Change PE Version' to use a different version of Windows PE for your rescue media:
You can change the version of Windows PE by choosing from the options in this dialog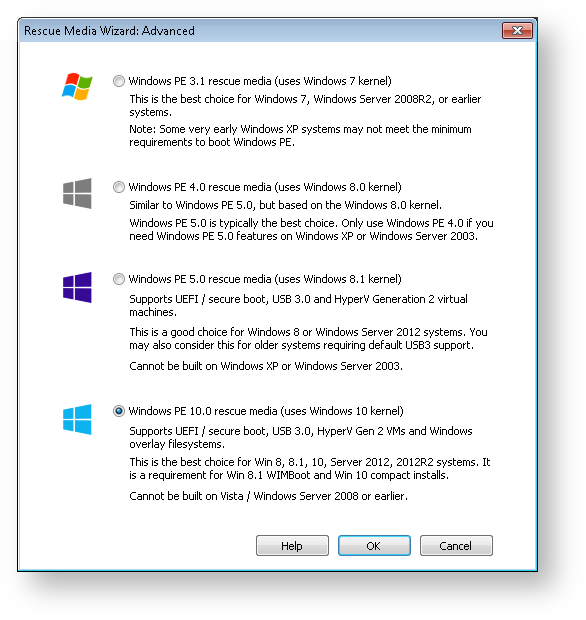
What version of Windows PE should I choose?
You should choose a version of Windows PE that can access your System drive and also your backup location. The default option selects the Windows PE version that is the best match for your Windows operating system. This enables the rescue media wizard to automatically copy any required drivers for Network, USB or SATA controllers. However, versions of Windows PE that are more recent than your Windows OS may already contain compatible drivers and also offer additional support for USB 3.0.
PE version Description Windows PE 3.1 Based on Windows 7. This is the best option for Windows XP, Vista, Windows 7, Server 2003, Server 2008, 2008R2 operating systems. USB 3.0 support is not included.
Note: Some very early Windows XP systems may not meet the minimum requirements to boot Windows PE.
Windows PE 4.0 Based on Windows 8. Similar to Windows PE 5.0, but based on the Windows 8.0 kernel.
This is a legacy option that is provided if you have used previous versions of Macrium Reflect before PE 5.0 was included. Includes support for USB 3.0. We recommend that you use PE 5.0/10 unless your require PE 5.0 features on Windows XP or Server 2003.
Windows PE 5.0 Based on Windows 8.1. Supports UEFI / secure boot, USB 3.0 and HyperV Generation 2 virtual machines.
This is a good choice for Windows 8/8.1 or Windows Server 2012 systems. You may also consider this for older systems requiring default USB3 support.
Note: The Windows PE 5.0 download option is not available if you are running Windows XP or Server 2003.Windows PE 10.0 Based on Windows 10. Supports UEFI / secure boot, USB 3.0, HyperV Gen 2 VMs and Windows overlay file systems.
This is the best choice for Win 8, 8.1, 10, Server 2012, 2012R2 systems. Windows PE 10 is a requirement if your system uses Windows 8.1 WIMBoot technology or if your system is a Windows 10 'Compact Install'. Both of these installation types are rare but may be used on Windows Tablet PCs with limited disk space.
Note: The Windows PE 10.0 download option is not available if you are running Windows XP, Vista or Server 2003/2008 Click Next and add device drivers if required.
This dialog enables you to add drivers for any Network and Disk controllers that are unsupported in Windows PE.
The sequence below shows an example of adding a device driver to the Windows PE build:

In the above example a driver is missing for a USB Controller. This is indicated by the icon next to the device description.
Click the 'Update Driver' button to search for a compatible driver.
Note: You can find driver install packages in several places. Most manufacturers create a driver folder on the hard drive of a new PC, often named after the manufacturer. If this is not present, you can download drivers from the device or PC vendor's website. For older PCs, manufacturers of devices and motherboards included driver CDs in the packaging, however, these may not be the latest.
For more information see Adding device driver software to Windows PE.Enter a folder or drive letter to search for compatible driver files.The location is recursively searched for .inf files and driver files that match the device
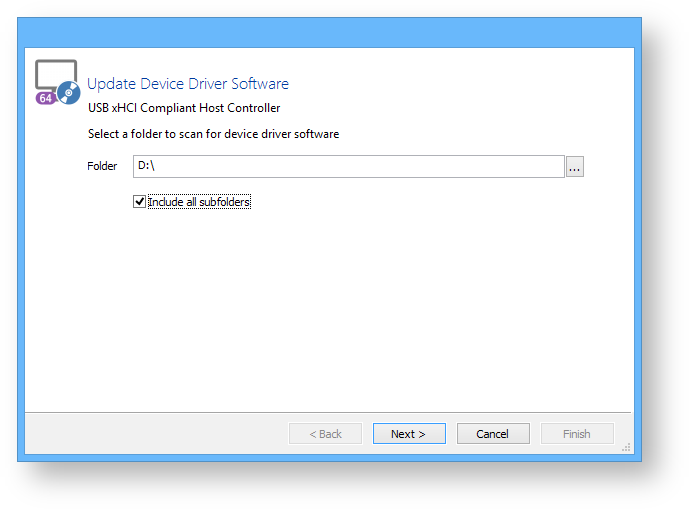

A compatible driver is found. Select it and click Next
The device now has a green tick next to it to indicate compatibility with Windows PE

Click Next. to prepare and build the Windows PE image
Note: If you have already built the Windows PE image for this rescue media then the wizard will skip this step and advance to the Burn page
Option Description PE Architecture Either 32 bit or 64 Bit. The default option is selected to match the architecture of the host Windows OS. Include optional components Select this option to add BitLocker Encryption and iSCSI support to the rescue media. Please note that adding these components may several minutes to the creation process.
See Adding iSCSI support to Windows PE for more information on using iSCSI in Windows PE
See Adding BitLocker support to Windows PE for more information on using Windows PE to access BitLocker encrypted drives.Default base WIM Use the standard Microsoft Windows PE base installation. Macrium Reflect executables will be added to this to crate the rescue media, Custom Base WIM Use your own customized WIM for the rescue media. This is an advanced topic not covered in this help. Click Next to begin the WIM build process. If necessary, files will automatically be downloaded from Microsoft to complete the build process.
A detailed log of the build process is saved to: 'C:\ProgramData\Macrium\waik\waiklog.txt'Once complete you can choose where to burn the media

Option ________________ Description Rebuild Click this button to advance to the 'Prepare Windows PE image' wizard page to rebuild the Windows Image (WIM).
Note: If updates are available to your rescue media then you will receive a message box prompting you to rebuild your media.
Check for unsupported devices Select this option and Windows PE will prompt to add drivers for unsupported Network Interface and Disk controllers when started. Prompt for key press Select this option to enable the 'Press any key to boot from CD or DVD...' prompt when your PC starts. This is useful if you want to bypass Windows PE and boot into your host Windows OS. CD/DVD burner Select this option to choose a CD/DVD device that you are using to create your rescue media.
To save the rescue media to an .ISO image file for burning with any burning software. Click the drop-down list of burners and select 'Create an ISO image file':
USB Device Select this option to save your rescue media to a bootable USB stick or external hard drive. Enable multiboot MBR/UEFI Only applies if you are saving your rescue media to a USB device. This option enables the USB device to boot both legacy MBR and GPT/UEFI for modern motherboards. Please consult your motherboard user manual for information on choosing these boot options at PC startup.
Note: CD/DVD media is always created multi-boot MBR/UEFITechnicians USB Applies to Macrium Reflect Technicians license keys only. See Technicians portable application support for more information Click Finish.
To complete the process, boot from your Rescue media to ensure it works correctly.
After Windows PE loads, Macrium Reflect runs. The Windows PE user interface for Macrium Reflect is identical to that of the main application and offers the same core functions.
If you are using USB media, you can make the Macrium Rescue Environment compatible with multiple computers:
- Use the Rescue media wizard to create a bootable USB rescue device on one computer.
- Repeat the process with each other computer in turn using the same USB device.
Once I have created rescue media, will it work on all my computers?
If the hardware for all your computers is supported by the default Windows PE driver set, then the answer is a simple yes. You can confirm this on the Rescue Media Wizard drivers page. If all the drivers listed have the status Device support in WinPE or Compatible device support in WinPE for each of your machines then you only need one rescue media.
If any of your machines require extra drivers, then you have three options:
- Create one piece of rescue media for each machine.
- Invoke the Create Rescue Media Wizard on each of your machines.
- Locate all the necessary drivers and progress to the Rescue Media Burn page before canceling.
- Copy the contents of
folder 'C:\boot\macrium\drivers' from each machine to one machine. - Burn a Rescue CD on that machine.
- Locate all the necessary drivers and progress to the Rescue Media Burn page before canceling.
- Using the Rescue media wizard, create a bootable USB stick, inserting the same device on each machine in turn.
Note: Options 2 and 3 only work if all your machines are configured to use the same version of PE with the same architecture (i.e. they are all 32-bit or all 64-bit).
If my rescue media refuses to boot, what should I do?
Verify your CD Try as many of the following steps as possible: Verify your PC. To boot rescue media from CD, your BIOS or UEFI firmware must be correctly configured and have hardware suitable for booting. Please try as many of the following steps as possible to diagnose this. Note that there is no standard for motherboard firmware configuration, so our instructions are necessarily non-specific. Please consult your motherboard manual for details relevant to your PC. What to expect when booting rescue media.
If it boots, this indicates a configuration or hardware issue with your PC. Please see Verifying your PC later in this article.
We have found that CD recordable media is of variable quality. Often, using different media will resolve your issue.
If Reflect is installed on the 2nd PC, please try creating rescue media there.
Alternatively, following the same CD creation steps as before, select Create ISO image file on the last page of the wizard. Transfer this to the 2nd PC and us a third party utility such as ImgBurn to burn the CD.
In each case, try booting the 1st PC with the new CD.
If the boot fails, this is indicative the your hardware is incorrectly configured. Please continue through this list for further diagnosis.
Boot menus vary in appearance and are invoked in different ways. You may need to refer to your motherboard manual to find the key combination to access this. Sometimes, this is displayed on the screen and is usually a key such as DEL, F8, F11, F12, F2 etc.
Please note that on UEFI/BIOS dual systems, you may be given the option to boot UEFI or not for each device. Please boot the type matching your installed OS. There are a few possible outcomes:
Please enter your BIOS or UEFI firmware setup utility and navigate to the "boot order" or "boot menu" equivalent screen. Please ensure CD/DVD booting has a higher priority than your hard disk, which may be labelled ATAPI, SATA, SCSI or various other labels depending on your system. Please press F10, or your equivalent for "save and exit" to reboot the system with the new priority.
Please note that some UEFI firmware may not have boot priorities for removable media, or booting from removable media may be a configurable option that you must enable.
Follows the same steps as used when creating a CD, selecting instead "USB media" on the last page. If this works and your have verified your CD, it is indicative that your hardware cannot boot a CD. However, a usb stick, is just as functional as a CD, so we recommend you use this as your rescue device.
For BIOS/MBR systems, in general, a PC with boot either a 32 and 64bit PE.
For EFI systems, the PE architecture must match the system type. A 32bit EFI CD will only boot on 32bit EFI systems and visa versa. Apart from a few tablet devices, all EFI systems are 64bit only.