A Backup Definition contains the data needed to perform a backup on a set of computers. Each definition contains settings for the following information:
- A list of computers which should be backed up.
- A set of rules describing which partitions, disks or files to backup on each computer
- A set of options and settings controlling how the backup files should be created and stored.
Backup Definitions contain all the information on how and what to backup. A Backup Definition can be run manually to perform a single backup of each computer or used to schedule regular backups into a Repository
Creating a Backup Definition
The 'Backup Definition' section option in Site Manager contains the list of existing Backup Definitions.
If there are no Backup Definitions created, a quick help page is shown instead:

Clicking on 'New Definition' will open the Backup Definition wizard.
The steps of the wizard are:
Step 1 - Definition Type

The first step is to select the type of Backup Definition. The types available are:
| Definition Type | Description |
|---|---|
| Disk Image | This definition type creates image backups of full disks or partitions. It is configured by setting a set of rules which control which partitions or disks are included. This is the most efficient backup type for large amounts of data and provided the correct partitions have been backed up, these image files can be used to restore a fully bootable Windows OS. |
| File and Folder | File and Folder backups only back up files on specific paths from a disk. This is a faster, more convenient backup type when only critical data from a disk needs to be backed up. e.g. c:\accounts\*.* |
Once the backup type has been selected, a name for the Backup Definition must be entered. This is for display purposes only. An optional description may also be entered.
Step 2 - Computers

This stage lists available computers to be part of the Backup Definition. Once the computers required have been selected, press Next to advance to the next step. This step will vary depending on the definition type selected in stage 1.
Step 2 - Disk Image - Disk Selection Rules
For Disk Image backups, the next stage is to select rules which control which partitions and disks will be imaged as part of the backup.

A set of rules are available on the left hand side of the screen. To use a rule, press the Add button on the rule to move it to the right have side of the list. Some rules have additional configuration such as a volume label or drive letter to match. In this case, a dialog box will pop up when adding the rule as seen below:

Once rules have been added, they are listed in the right hand pane of the interface. If a rule has additional configuration, it can be reconfigured by pressing the pencil icon on the right of the rule name. A rule may be removed by clicking it to select and clicking the Remove button.
To assist in configuration, pressing the Check Matching Partitions button will show the partitions on the computers in the definition which match the rule:

The disk matching information can be filtered by computer or to show only computers with no matches.This can help identify any gaps in rules.
For simple operation, there is an 'All Disks' rule which will match everything on all computers.
Exclude Rules
There are exclusion rules as well as inclusion rules - the exclusion rules make it easier to backup all data except those meeting the criteria. For example, if there are multiple computers in the definition, each with a number of partitions and drive letters which need to be backed up without backing up the Windows partitions, this can be achieved using an exclusion rule. Exclusion rules work in the following way:
- Exclude rules override include rules - a definition with an include rule for system drives plus an exclude rule for the C: partition will backup system partitions except for the C: partition.
- If there are only exclude rules, all partitions are included except for those specified by the exclude rule - a definition with just an exclude rule for C: and D: partitions will backup all other partitions.
Once rules are configured, press next to move to the next step.
Step 2 - File and Folder - File and Folder Selection
For File and Folder backups, the next stage is to select the folder rules which will be used to identify the files to backup.

At least one folder must be added, using the Add Folder button.

The Add Folder dialog has the following options:
| Option | Description |
|---|---|
| Folder to Backup | The folder path on the Agent computer which will be included in the backup. |
| Include subfolders | If checked, this option will cause any matching files in subfolders of the target folder to be included in the backup |
| Exclude hidden files and folders | If checked, any files or folders with the 'hidden' file system attribute will be ignored |
| Exclude system files and folders | If checked, any files or folders with the 'system' file system attribute will be ignored |
| Files to include | A file mask for names of files to include within the selected folder/subfolder. e.g. *.docx will include only document files |
| Files to exclude | As files to include, but these files will be excluded. Takes precedence over the include list |
| Folders to exclude | As files to exclude, except it is used for subfolder names. Only relevant when Include subfolders is used |
Multiple rules can be added to one definition - files matching any rule will be backed up. Rules can be removed and edited using appropriate buttons:

Once rules are configured, press next to move to the next step.
Step 3 - Options
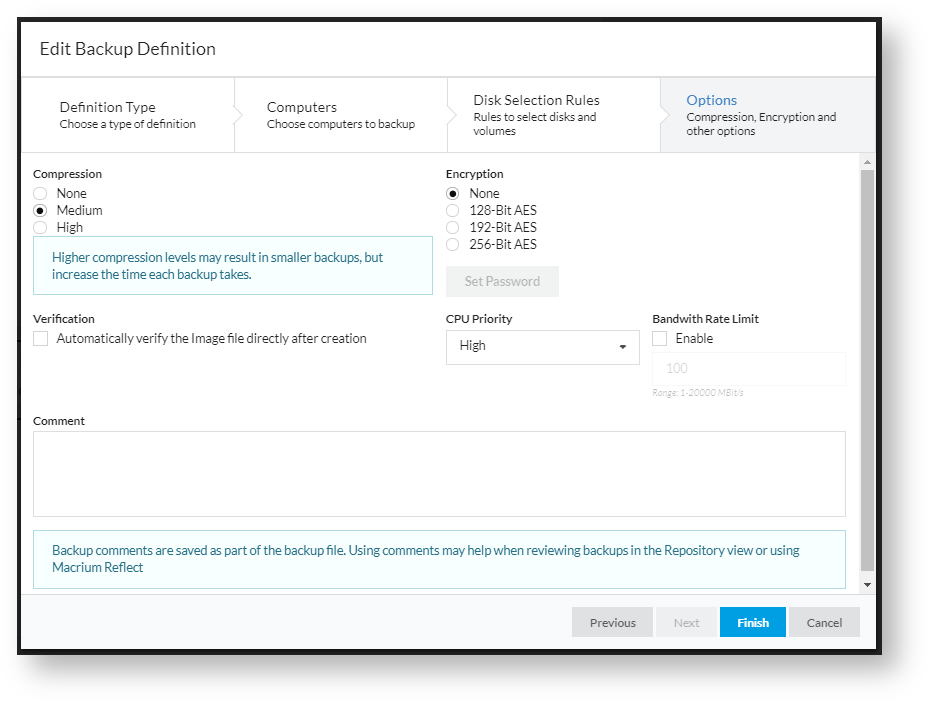
In step 3, options for how the backup files are created are set.
| Backup Option | Description |
|---|---|
| Compression | The level of compression to use in any backup files created when using this Backup Definition. The default level is 'Medium'. |
| Encryption | The type of encryption to use on any backup files created from this Backup Definition. If AES encryption is used, a password must be entered using the 'Set Password' button. |
| Verification | If this option is selected, backup files will be reread and verified immediately after creation. |
| Comment | If a comment is entered here it will be saved as part of any backup files created and be visible to any restore tools. |
| CPU Priority | The CPU priority to run the backup process as. Lower priorities may result in the backup taking longer if there is contention for CPU resources. The default priority is High |
| Bandwidth Rate Limit | If enabled, a rate limit can be set for writing to the repository. This will limit the write rate to a specified number of MBit (megabits) per second. This can be used to help manage bandwidth when performing large numbers of backups. In the backup progress, a higher transfer rate than the rate limit may be displayed. This is because the transfer limit counts the amount of data read from the source disk and saved into the backup file without including compression. After backup is completed, the read and write rate are shown in the backup log. |
Once the options are set appropriately, press finish to complete the wizard and save the Backup Definition. If there are any errors or issues with saving the Backup Definition, the wizard will not close and an error message will be displayed. If appropriate any affected fields will be highlighted in red.
Backup Definition Operations
Once Backup Definitions have been created, they are shown in a list as below:


The selected Backup Definition can be changed by clicking on the list of names in the left-hand column. Once a Backup Definition has been selected, the configuration of that Definition is shown. Several operations can be performed on this Definition.
Deleting a Backup Definition
Clicking the 'Delete' button to the right of the definition name will delete the selected Backup Definition.
Copying a Backup Definition
Clicking the 'Copy' button to the right of the definition name will copy the selected Backup Definition to a new Definition which can then be edited. This is useful for creating multiple Definitions with only minor differences. The new Definition must be given a new name:

Editing a Backup Definition
Editing a Backup Definition is possible by clicking any of the Edit buttons in the page. Each button will open the Backup Definition wizard at the appropriate wizard step. This is the same process used in creating a Backup Definition except the wizard will be pre-populated with data from the selected Definition. When editing a Backup Definition the 'Finish' button may be pressed at any stage and not just the final one.
Running a Backup Definition Manually
To run a Backup Definition on a one-off basis, the Run Now button can be clicked. This opens a dialog which allows to to select:
- The computers to backup
- The Repository to backup to
- The type of backup (Full, Differential, Incremental)

Selecting Run will run the backup with the selected options. Run Now backups can be seen in the forecast in the Dashboard page.
Backup Types
If a Differential or Incremental backup is selected without a corresponding Full backup in the Repository to base the Differential or Incremental backup on, the computer will perform a Full backup instead.
Running Backups Automatically on a Schedule
To perform automated backups according to a schedule, The Backup Definition can be scheduled to run in a Repository according to a Schedule. More information is available here.