A file and folder backup is a useful way to backup your working files, personal files and precious data. Unlike other backup solutions Macrium Reflect can backup open /and locked files by using Microsoft Volume Shadow copy Service (VSS). You can backup your Documents folder and save the backup as an XML file for easy re-running and scheduling. Caution: If you wish to
| Info |
|---|
To backup your |
...
Windows operating system, do not use a |
...
file and |
...
folder backup, use an |
...
image backup, see Creating a backup of your computer. A |
...
file and |
...
folder backup is not suitable for restoring your Windows |
...
operating system. |
- Select Backup Tasks
- Select
From the Backup task bar, select Create a File and Folder backup to start the backup wizard.

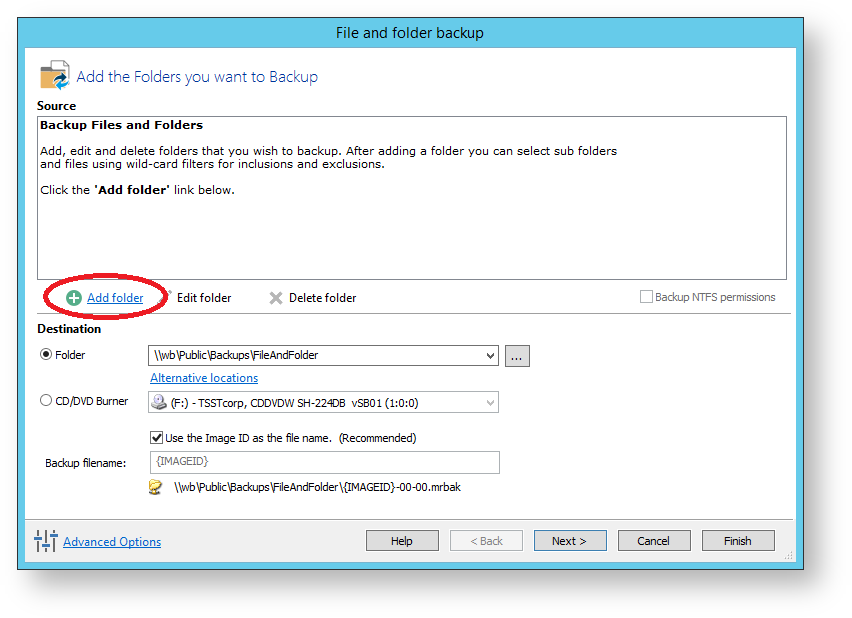
Select Add folder as shown:Anchor 0 0

Select.
The Select Folder to backup dialog appears.

Select the folder you want to backup, or the folder containing the files you want to backup.
In this case, the Documents folder has been selected. This opens File and folder backup.

- If desired, click OK to use the default settings.
- Otherwise, several
Several different masks and wildcards can be specified to include specific files within the given directory or exclude other files.
For example, by default, all .temp, .tmp, .bak and .~* files are excluded from the backup.
Option Description Include subfolders Recurse all folders below the backup folder using the specified filters Exclude hidden files and folders Do not backup files or folders that have the Hidden attribute Exclude system files and folders Do not backup files or folders that have the System attribute Add files to include Add a semi-colon separated list of file name filters to include in the backup. Use the asterisk * character as a wild card.
For example; *.doc; *data*; *.xlsAdd files to exclude Add a semi-colon separated list of file name filters to exclude from the backup. Use the asterisk * character as a wild card.
Note: Exclude filters take precedence over include filtersAdd any folders to exclude Add a semi-colon separated list of folder name filters to exclude from the backup. Use the asterisk * character as a wild card.
Filter names can be full path and/or folder names.
For example:
*temp* will exclude all folders with the letters 'temp' anywhere in the folder name
*\data\temp* will exclude all paths where the folder name begins with 'temp' that has a parent folder named 'data' - Click OK
- Repeat to add further individual directories if necessary. Specify
- , in
In the Destination section,
wherespecify where you want the backup to be made.
Caution: if you plan to automatically delete your excess backups using Disk Space Management (DSM), for example, after scheduling your backups, take care choosing the destination folder.
DSM deletes the oldest backup sets in the destination folder to make space for new backups. DSM for one (XML) Backup Definition can delete backups sets created by another Backup Definition if they are in the same destination folder. Use different folders as part of a retention policy for backups so this does not happen, if you do not want it to.
DSM works at folder level, but only on the designated destination folder of the backup.For information: A backup set consists of a full backup and any incrementals or differentials with the same Image ID.
- click Next.
- The

Alternative Locations can be used to provide backup rotations or as a fail safe for temporary unavailability of the primary backup destination. - When you have finished adding folders and making all necessary changes, click Next.
The Backup Plan Page is shown:Anchor 1 1 
Include+ scrollPageId 0A80000A014B7E752054FBC138C1C1CC - The summary screen gives the details of what is being backed up. Click Finish.
If required, You are now given the opportunity to save the backup
details in an XML definitions file. Enter a meaningful name for the backup. Click OK.

The backup should be performed automatically.
Video Tutorial
You can view a Youtube tutorial on backing up files and folders below:
| HTML |
|---|
<iframe width="560" height="349" frameborder="0" src="http://www.youtube.com/embed/a2pBAHxSNGA"></iframe> |
options.
Include+ scrollPageId 0A80000A014D9A75AD084D0E29C6C15E If you want to run the backup at this point, select 'Run this backup now' and click OK.