...
| Info |
|---|
To backup your Windows operating system, do not use a file and folder backup, use an image backup, see Creating a backup of your computer. A file and folder backup is not suitable for restoring your Windows operating system. |
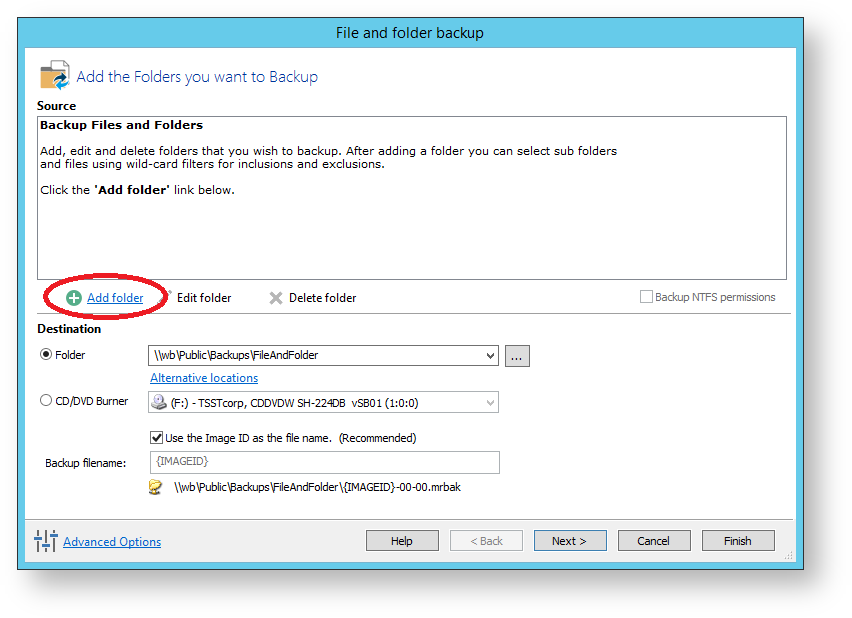
From the Backup task bar, select Create a File and Folder backup to start the backup wizard.

Select Add folder.Anchor 0 0 
The Select Folder to backup dialog appears.

Select the folder you want to backup, or the folder containing the files you want to backup, Click OK.
The Select Folder to backup dialog appears.

Several different masks and wildcards can be specified to include specific files within the given directory or exclude other files.Option Description Include subfolders Recurse all folders below the backup folder using the specified filters File inclusion mask AddExclude hidden files and folders Do not backup files or folders that have the Hidden attribute Exclude system files and folders Do not backup files or folders that have the System attribute Add files to include Add a semi-colon separated list of file name filters to include in the backup. Use the asterisk * character as a wild card.
For example; *.doc; *data*; *.xlsFile exclusion maskAdd files to exclude Add a semi-colon separated list of file name filters to exclude from the backup. Use the asterisk * character as a wild card.
Note: Exclude filters take precedence over include filtersFolder Exclusion MaskAdd any folders to exclude Add a semi-colon separated list of folder name filters to exclude from the backup. Use the asterisk * character as a wild card.
Filter names can be full path and/or folder names.
For example:
*temp* will exclude all folders with the letters 'temp' anywhere in the folder name
*\data\temp* will exclude all paths where the folder name begins with 'temp' that has a parent folder named 'data'Exclude hidden and system files Do not backup files that have Hidden or System attributes - Click OK
- Repeat to add further individual directories if necessary.
In the Destination section, specify where you want the backup to be made.


Alternative Locations can be used to provide backup rotations or as a fail safe for temporary unavailability of the primary backup destination.- When you have finished adding folders and making all necessary changes, click Next.
- If required, edit the backup plan, click Next.
For more information on editing the backup plan and advanced backup options see Scheduling backups. - The
The Backup Plan Page is shown:Anchor 1 1 
Include+ scrollPageId 0A80000A014B7E752054FBC138C1C1CC - The summary screen gives the details of what is being backed up. Click Finish.
If required, You are now given the opportunity to save the backup details in an XML definitions file.

Info Note: Saving a backup definition enables you to run your backup definition at any time with a single click Info Note: You must save your backup definition if you have created backup schedules. Your schedules cannot run if this step is missed. options.
Include+ scrollPageId 0A80000A014D9A75AD084D0E29C6C15E If you want to run the backup at this point, select 'Run this backup now' and click OK.