| Panel | ||
|---|---|---|
| ||
By mounting image files in Windows Explorer you can browse or explore an image and access all the files in a backup. The backed up data appears as a temporary drive in Windows Explorer that you can access, just like any other drive, mounted |
...
with its own drive letter. |
...

It is also possible to mount an image within Macrium Reflect with the same outcome as from Windows Explorer. If you have a file/folder backup (not image backup) Macrium Reflect has a wizard to restore selected files and/or folders to a place of your choosing.
By mounting and browsing images you gain access to images that are created on other PCs and if, when mounting an image, you chose the option Make writeable you are able to recover some images without first recovering their files, saving time.
Note: The image is mounted as read only, unless you select to make it writeable. This means that you cannot change the contents of the mounted drive but you can copy files from the mounted image or file/folder backup in Windows Explorer to your PC using Copy/Paste (or by dragging). You can also open files (such as MS Word documents) by double clicking.
...
Individual Files and Folders can easily be recovered by using Copy and Paste. If you mount an incremental or differential backup |
...
, the chosen folder must contain all the files required to load |
...
the image. Meaning an incremental backup requires all the |
...
previous files in the backup set to be present, and a differential backup requires the |
...
full backup to be present. For example, If your |
...
backup is split across multiple DVD's then it isn't possible to mount the backup. If you restart Windows, all temporary mounted Images are detached.
|
There are several ways to mount / unmount an image:
| Table of Contents | ||
|---|---|---|
|
Note: If you have a problem mounting your images, it is possible that the psmounter has failed. To resolve this issue it is recommended you reinstall Macrium Reflect. This problem can be caused by anti-virus software disabling features as a security precaution.See also: Browsing Linux EXT File System Images
...
Mounting an image in Windows Explorer
Navigate to the location of the image you wish to mount.
Right click the image file and select Explore image.


Select the partition you wish to mount and Click OK.
In this example, the image only contains one partition.
You can also select which Drive Letter you would like to be assigned.

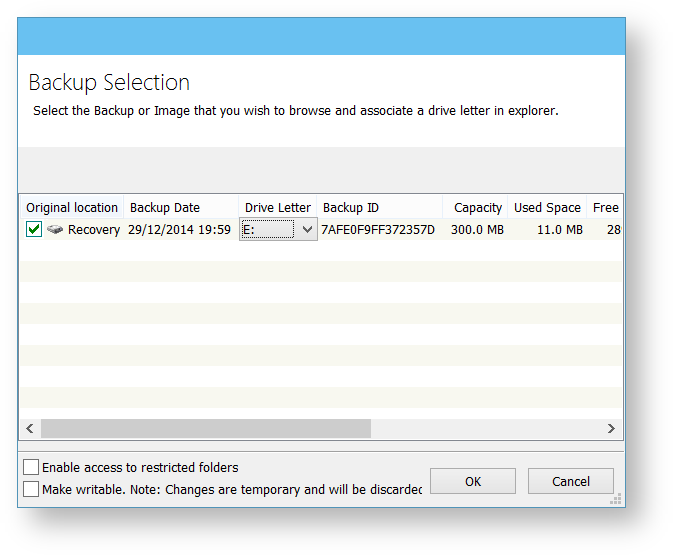
The option Enable access to restricted folders mounts the image with full New Technology File System ( NTFS ) access rights to all folders in the image. This means you can browse images created on another PC , some folders however, may be inaccessible due to NTFS security restrictionswithout having to grant NTFS permissions.
The option Make writable makes the mounted file system temporarily writable. This is useful when accessing files in the image where the opening application is required to write to the file. For example, Microsoft Virtual Hard Disk (.vhdx) files can be mounted and files in the mounted backup can be recovered without having to restore the .vhdx file first.
Info Note: Changes made to the mounted file system are temporary and are discarded when the image is unmounted. You can now navigate through the image in Windows Explorer.

...
Using Macrium to mount an image
In the main window of Macrium Reflect, select Restore.


- Select the image you wish to mount then click the Browse Image link.
- Follow the instructions from step 2 above.
...
Using Macrium Reflect Command Line Interface (CLI) to mount an image
Open a command prompt and change the directories as necessary so the path to
reflect.exeis shown.
See Running an elevated command prompt.
Complete the command line as follows:
switchesCode Block language text theme FadeToGrey reflect.exe ["Path to Image file"] [Add one or more
Press Enter.switches]
Note: Instead of insertingPath to Image fileyou can also replace it withLAST_FILE_CREATEDif you want the last Image created in the current Windows session to be mounted.
Available CLI switches:-bBrowse Image, always needed to mount Image. -autoDo not show the Backup Selection dialog and automatically mount all partitions in the image file. -drivesA comma separated list of drive letters to use for the mounted image eg; -drives m,n If no drive letters are specified then the next available letters are used.
Info Note: To 'skip' mounting a partition use the Asterisk character instead of a drive letter -passUse for password protected Image files, add password in inverted commas. e.g. -pass "password" Note: If you do not use -auto you will be prompted with the Backup Selection dialog to assign the drive letters.
...
To mount an image and prompt for a drive letter:
| Code Block | ||||
|---|---|---|---|---|
| ||||
C:\Program Files\Macrium\ |
...
Reflect>reflect.exe "J:\76FF71EBBB032A35-00-00.mrimg" -b |
...
|
To mount all partitions of an image using the next available drive letter(s):
| Code Block | ||||
|---|---|---|---|---|
| ||||
C:\Program Files\Macrium\ |
...
Reflect>reflect.exe "J:\76FF71EBBB032A35-00-00.mrimg" -b -auto |
To mount all partitions for the last image created in the current Windows session:
| Code Block | ||||
|---|---|---|---|---|
| ||||
C:\Program Files\Macrium\ |
...
Reflect>reflect.exe "LAST_FILE_CREATED" -b - |
...
auto |
To mount all partitions in an image using drive letters p,q,r
| Code Block | ||||
|---|---|---|---|---|
| ||||
C:\Program Files\Macrium\ |
...
Reflect>reflect.exe "J:\76FF71EBBB032A35-00-00.mrimg" -b -auto -drives p,q,r |
To mount the third partiton only using drive letter 'R'
| Code Block | ||||
|---|---|---|---|---|
| ||||
C:\Program Files\Macrium\Reflect>reflect.exe "J:\76FF71EBBB032A35-00-00.mrimg" -b -auto -drives *,*,r |
To mount all partitions in a password protected image using drive letters p,q,r where pwd is the password,(the password is case sensitive):
| Code Block | ||||
|---|---|---|---|---|
| ||||
C:\Program Files\Macrium\ |
...
Reflect>reflect.exe "J:\76FF71EBBB032A35-00-00.mrimg" -b -auto -drives p,q,r -pass "pwd" |
...
|
...
Unmounting a temporary mounted drive
...
- To detach a temporary mounted drive using Windows Explorer, right click the drive you wish to unmount.
Scroll to Macrium Reflect, click Unmount Macrium Image.


The image will be removed.
Using Macrium Reflect:
- In the Macrium Reflect application, select Restore in the top menu.
Select Detatch Image.
 Take the 'Restore' > 'Detach Image' menu option.
Select the drive letter you wish to unmount.

Using the CLI:
Open a command prompt and change the directories directory as necessary so the path to
reflect.exeis shown.
See Running an elevated command prompt .
Complete the command line as follows:
Code Block language text theme FadeToGrey reflect.exe [drive letter to detach] [-u]
(if no drive letter is included the switch
-uwill detach all temporary mounted drives).
Press Enter.
Examples of using CLI to unmount an image:
To Detach all temporary drives:
| Code Block | ||||
|---|---|---|---|---|
| ||||
C:\Program Files\Macrium\ |
...
Reflect>reflect.exe -u |
...
|
To Detach Drive J only:
| Code Block | ||||
|---|---|---|---|---|
| ||||
C:\Program Files\Macrium\ |
...
Reflect>reflect.exe J -u |
...
|
...
Conditional Content
Related articles
| Content by Label | ||||||||||||||||
|---|---|---|---|---|---|---|---|---|---|---|---|---|---|---|---|---|
|
| Page properties | ||
|---|---|---|
| ||
|
| Info | ||
|---|---|---|
| ||
| If you have a problem mounting your images, it is possible that the image mounting system driver has failed to load correctly. To resolve this issue it is recommended you reinstall Macrium Reflect. This problem can be caused by anti-virus software disabling features as a security precaution. |