Note: Macrium Reflect v8 adds improved the Restore and Clone functionality by adding automatic fill/shrink where the target disk is a different size to the source. The most common disk copy tasks are automated by using the toolbar 'Copy' functionality but we've also added the ability to set free space before and after a copied partition to precisely locate and resize partitions on the target disk.
Please see Restore and Clone Partition Layout
Hard disks are organized into partitions, similar to a filing cabinet, to optimize the use of space on the device. Each partition contains a small amount of error correction data, in case of a fault. Partitions are aligned to further optimize the amount of error correction data they require, maximizing the available space on the device.
There are two alignment possibilities used by Windows:
1MB alignment. Beginning with Windows Vista/Server 2008 partitions are aligned on 1MB boundaries. For a disk with 512 bytes per sector, this equates to 2048 sector alignment.
Cylinder, Head, Sector (CHS) alignment. This is the alignment used by all Windows versions, up to and including Windows XP/Server 2003. Disks are described as having sectors, heads, and cylinders, typically 512 bytes per sector, 63 sectors per head, and 255 heads per cylinder. A head is often referred to as a track. Partitions start on a head (or track) boundary and end on a cylinder boundary http://en.wikipedia.org/wiki/Cylinder-head-sector.
Solid State Disks (SSD) require partition alignment to 4KB boundaries for optimum performance and life. 1MB aligned partitions are aligned on 4KB boundaries so present no problem, however, CHS aligned partitions are often aligned on 63 sectors (31.5KB) degrading SSD performance and life span considerably. This can be improved by modifying restore destination partition properties when you restore an image.
When you ask to restore images Macrium Reflect initially sets out to restore the partitions back to their original position on the disk. From here you can modify their destinations.
To modify the restore destination:
Click the Restore icon.
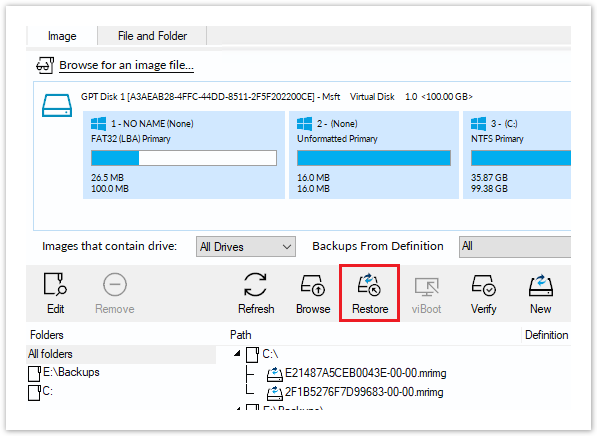
The following dialog shows. Source shows the location of the image file we are restoring from. The Target is the original location.
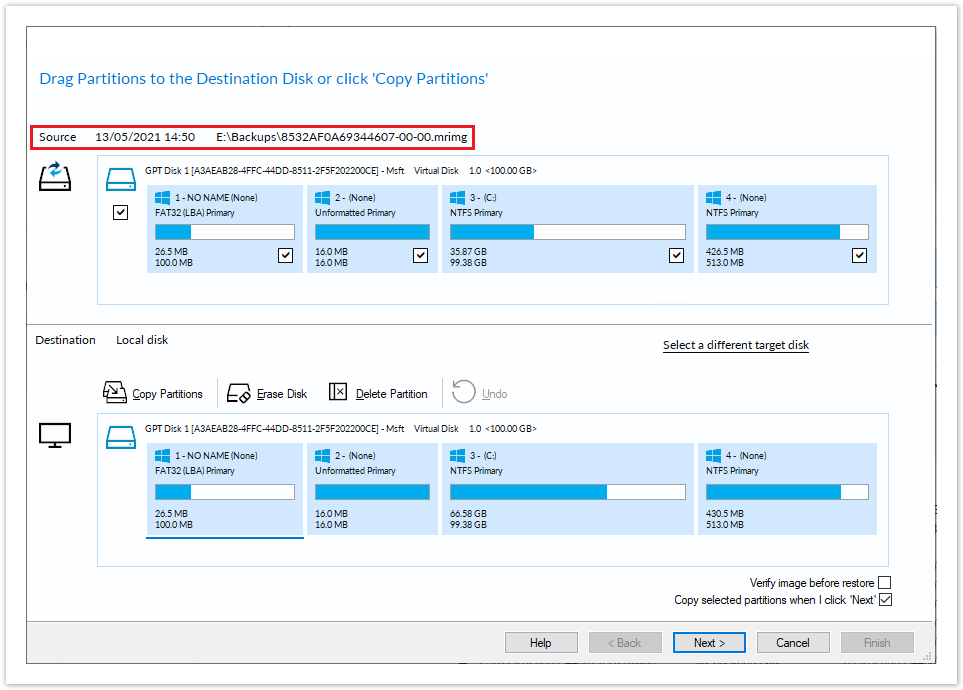
- Click Select a different target disk and select the required target disk.
- If you have partitions on the target disk which you are sure can be deleted, select each one in turn and click Erase Disk to delete all partitions on the disk, or select Delete Partition to delete certain partitions.
Drag the source partition onto the destination partition.
The partition locates to the first available free area of the new disk. In this case, partition 2.

- The partition can be floated between the left and right of the disk, and also resized. The partition shown below has been floated to the right:

Click Layout to open the partition properties window for additional options.

There are a number of things you can do here:
Modify the drive letter by selecting another from the list.
Click between the arrows < > above the disk view and drag the partition to a new size.
Fine-tune the Partition Size, Free Space, and Location on the destination disk.
Click Maximum Size to configure the partition to the maximum available unallocated space on the disk, in this case about 10 TB (the size of the disk)
Click Minimum Size to configure the partition to the minimum size, The minimum size is equivalent to the used space on the restored partition plus 50MB.
Click Revert to set the partition to the same size as it was when backed up.
Note: If the source disk is an MBR disk and the target is greater than 2TB in size then the restore process will automatically convert the disk to GPT style format.
- Click OK.
See also: Drive letters assigned to restored or cloned partitions