The Rescue Media Wizard
- Insert your blank CD, DVD or USB stick.
From the Backup tab of the task pane, below Other Tasks, click Create bootable Rescue media.

Accept the default Windows PE environment selected by Macrium Reflect or Click 'Change PE Version' to use a different version of Windows PE for your rescue media:Main User Interface
Macrium Rescue Media Builder provides a simple interface to allow for quick rescue media generation by selecting where the rescue media will be generated and then clicking a 'Build' button.
All options for the rescue media will be suitably defaulted based on existing rescue media builds and a scan of the operating system environment.
- Choose a rescue media target under 'Select Device'
- Click 'Build'

The 'Header' area shows the currently selected Windows PE/RE version and settings. 'Show more' expands the view to show the selected Advanced options.
Rebuilding the Windows Image File (WIM)
If the Rescue media needs rebuilding then this will be indicated in the header area. Reasons for rebuilding:
- A later version of Macrium Reflect is available and needs to be added to the build.
- A later version of Windows RE is available. A Windows update can cause the installed version of Windows RE to be updated.
- Any 'Advanced' settings that have changed since the rescue media was last built. If you click 'Show more' these settings will be highlighted in blue text.
- A 'Custom WIM' file has changed since the last build.
- The '\Boot\Macrium\Drivers' sub folder contains new or changed driver files.
Pressing 'Build' will re-populate the Staging Area, mount the WIM and copy the relevant files before dismounting the WIM and continuing with the build target operation.
WIM Rebuild Override
Overriding the default WIM rebuild behaviour may be useful to create rescue media without updating to a later release of Macrium Reflect, or, to force a rebuild to troubleshoot corrupt or non-booting rescue media or boot menu option.
The default WIM rebuild action can be overridden by pressing the 'Ctrl' key. Once pressed, and if appropriate, the 'Build' button becomes a 'Split' button showing either a 'Skip WIM Rebuild...' or a 'Force WIM Rebuild...' menu option, the opposite of the default 'Build' button behaviour. .


The override menu is not displayed in the following scenarios:
- The 'Remove boot menu' option is selected. WIM operations are not relevant in this case.
- The WIM needs rebuilding and the 'Current boot menu' option is selected. In this case, the default operation of rebuilding the WIM is the only operation relevant and available.
The 'Select Device' area shows a list of possible ways the rescue media can be created.
Target Description Windows Boot Menu Will either add, update or remove an entry from the Windows Boot Menu, select from the 'Boot Menu Options' for the desired action. USB Flash Drive Creates the rescue environment on an external USB flash drive. At least one partition is required on the drive with enough space for the rescue media files or the disk should be empty of partitions but be large enough for a new partition to accommodate the rescue media files. USB HDD Creates the rescue environment on an external USB HDD. As with the USB Flash Drive option a partition must be available with enough space or there should be enough space to create a new partition. ISO File Creates an ISO file suitable for either burning with third party software or booting a virtual machine from. Note: In the case of external USB Flash/HDD the creation process is non destructive. No existing partition will be removed from the disk, only files added to an existing partition or a new partition created.Boot Menu Options
Selecting the 'Windows Boot Menu' device will offer the following options
Option Description No boot menu Do not add a boot menu option to the Windows boot menu.
Note: This option is not visible if a Macrium Reflect rescue environment exists in the Windows boot menuAdd boot menu Add the currently selected WinPE/WinRE environment as a Windows boot menu item. A description of the current enviroment can be seen to right of this option. Also, review the 'Header' area further up in this document. Remove boot menu Remove the currently configured Macrium Reflect rescue environment Windows boot menu item. Current boot menu Retain the currently configured Macrium Reflect rescue environment Windows boot menu item. USB Rescue Media Options
Selecting either 'Removable USB Flash Drive' or 'Removable USB Hard Drive' device will offer the following options
Option Description Check for devices missing drivers on boot Scans for Mass storage or network controllers that do not have driver support and show a dialog to assist with adding and loading drivers. Enable Multi Boot (MBR/UEFI) Enables USB media to boot on both MBR and UEFI systems. Create Portable Technicians Rescue Media Adds support for running the 'Technicians Portable' form of Macrium Reflect rescue environment.
Note: This will require a valid Technicians license keyISO/CD/DVD Rescue Media Options
Selecting 'ISO File' or 'CD/DVD Burner' device will offer the following options
Option Description Check for devices missing drivers on boot Scans for Mass storage or network controllers that do not have driver support and show a dialog to assist with adding and loading drivers. Prompt for key press to continue boot sequence Shows a simple prompt during boot, pressing any key will boot from the ISO media and not pressing any key will boot from the normal volume. Advanced Options
The 'Advanced' button opens options to change PE version and choose additional features for the rescue media build.
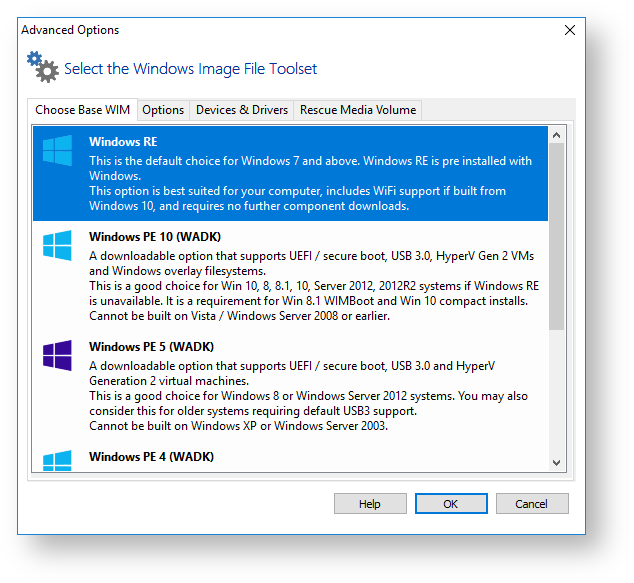
What version of Windows PE should I choose?
The default Windows PE version selected on a fresh installation:
OS Default Rescue Environment Windows XP/Server 2003 Windows PE 3.1 Windows 7/Server 2008 Windows RE if available otherwise Windows PE 3.1 Windows 8.0/8.1/Server 2012/R2 Windows RE if available otherwise Windows PE 5 Windows 10/Server 2016./17 Windows RE if available otherwise Windows PE 10 You should ensure that your rescue media can access your System drive and also your backup location. The default option selects Windows RE if available. If Windows RE is not supported or cannot be located then the Windows PE version is selected that is the best match for your Windows operating system (see table above). This enables the rescue media wizard to automatically copy any required drivers for Network, USB or SATA controllers. However, versions of Windows PE that are more recent than your Windows OS may already contain compatible drivers and also offer additional support for USB 3.0.
Note: For Windows 7 systems with USB 3.0 ports it may be necessary to use PE 5.0 or PE 10.0 to enable USB 3.0 in the rescue media
PE version Description Windows RE This is the default choice for Windows 7 and above. Windows RE is pre installed with Windows. If available, this option is best suited for your computer, includes WiFi support if built with Windows 10 and requires no further component downloads.
Note: Not available for Windows XP/Vista or for later Operating Systems if Windows RE cannot be located.Windows PE 10.0 Based on Windows 10. Supports UEFI / secure boot, USB 3.0, HyperV Gen 2 VMs and Windows overlay file systems.
This is a good choice for Win 8, 8.1, 10, Server 2012, 2012R2 systems if Windows RE is unavailable. Windows PE 10 supports Windows 8.1 WIMBoot technology and Windows 10 'Compact Install'. Both of these installation types are rare but may be used on Windows Tablet PCs with limited disk space.
Note: The Windows PE 10.0 download option is not available if you are running Windows XP, Vista or Server 2003/2008Windows PE 5.0 Based on Windows 8.1. Supports UEFI / secure boot, USB 3.0 and HyperV Generation 2 virtual machines.
This is a good choice for Windows 8/8.1 or Windows Server 2012 systems if Windows RE is unavailable. You may also consider this for older systems requiring default USB3.0 support.
Note: The Windows PE 5.0 download option is not available if you are running Windows XP or Server 2003.
Windows PE 4.0 Based on Windows 8. Similar to Windows PE 5.0, but based on the Windows 8.0 kernel.
This is a legacy option that is provided if you have used previous versions of Macrium Reflect before PE 5.0 was included. Includes support for USB 3.0. We recommend that you use PE 5.0/10 unless your require PE 5.0 features on Windows XP or Server 2003.
Windows PE 3.1 Based on Windows 7. This is the best option for Windows XP, Vista, Windows 7, Server 2003, Server 2008, 2008R2 operating systems if Windows RE is unavailable.
Note: USB 3.0 support is not included.Note: Some very early Windows XP systems may not meet the minimum requirements to boot Windows PE.Note: If you have already built rescue media with an earlier version of Macrium Reflect then that PE version will be defaulted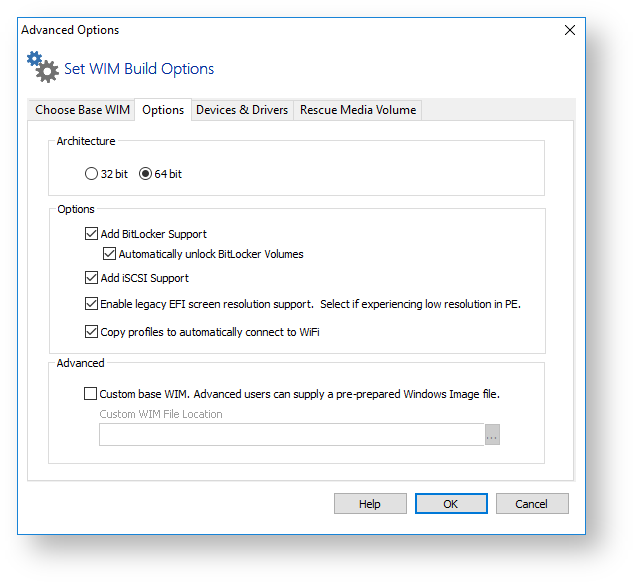
Option Description Architecture Choose from 32 or 64 bit.
WinRE is only available for the same architecture as the current Windows OS.It's only necessary to choose an alternative architecture when creating rescue media to boot a different PC.iSCSI Support Enables restoration and clones to iSCSI connected disks. Please note that adding these components may several minutes to the creation process.
See Adding iSCSI support to Windows PE for more information on using iSCSI in Windows PEBitLocker Add Support Add the components required to run 'managebde.exe' and unlock BitLockered drives to Windows PE. Auto Unlock Automatically unlocked BitLockered drives when the rescue media starts.
Also see: Adding BitLocker support to Windows PE and BitLocker Restore/Clone OutcomesLegacy EFI Screen Resolution Select this option if you are experiencing very low, less than 1024 x 768, screen resolution in PE 10 or WinRE. Some early UEFI BIOS chipsets are incompatible with Windows 10 Pre-Installation Environment graphics output. Selecting this option will cause the PE 5.0 EFI microcode to be used instead of PE 10 when starting the rescue environment. Copy WiFi Profiles Select this option to copy WiFi profiles, including passwords, to the rescue media. If possible a WiFi connection will be automatically established when Windows RE starts.
Note: This option, and WiFi support, is only available in Windows RE 10. WiFi profiles are encrypted to prevent unauthorised access.Custom base WIM Use your own customized WIM for the rescue media. This is an advanced topic not covered in this help. 
Mass Storage and Network devices will be listed showing the current state of driver support. Drivers can be added for devices missing driver support as well as updating drivers previously added to the rescue media.
The status of a device can be one of the following
Device Status Meaning Device Detected The device has no drivers and will not function in WinPE/WinRE. If you require this device then drivers should be added. Device support in WinPE The device has a supporting driver in WinPE/WinRE. Generally you do not need to update this form of driver. Compatible device support in WinPE The device has a compatible driver in WinPE/WinRE. Again, this driver generally does not require updating. Driver already present in Drivers folder A driver has been previously added to the Macrium Reflect rescue media for this device. Copy host driver For Vista based and later operating systems if a device is found without driver support then the operating system will be scanned for a compatible driver. If discovered the host OS driver will be added to the rescue media.
Note: If no compatible device is found then the status will remain at Device DetectedHow To Update Drivers
Note: Click Update or double click a device to add or update a driver for a device.WiFI Device Support
Note: WiFi device support will only be available in WinRE based rescue environments, even if drivers are added for the device.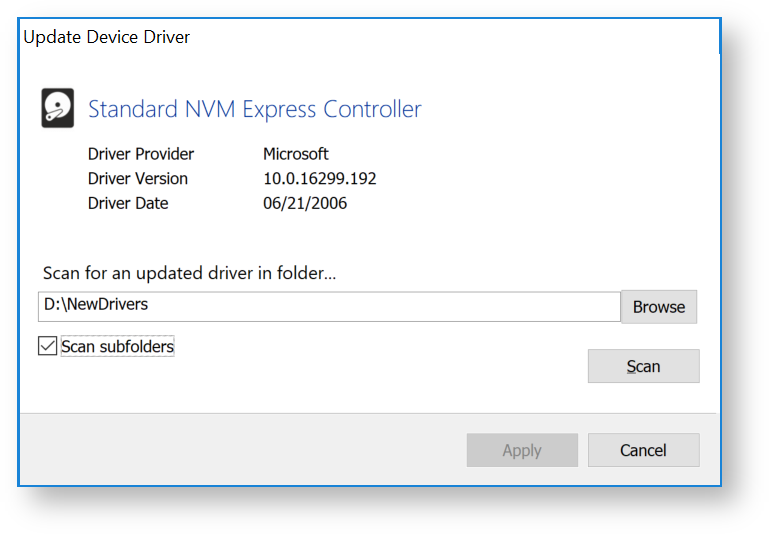
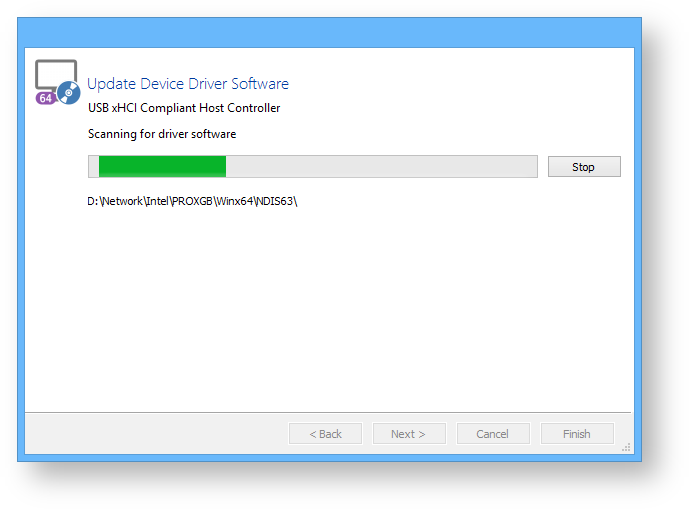
This dialog will show the current driver information for a device. To update the driver, click Browse, select a folder and click the Scan button (optionally select to scan subfolders before starting the scan). The folder willk be checked for an updated driver based on either version number or date and if discovered, a prompt will be shown for update confirmation.

Once an updated driver has been found and selected, click Apply to save the updated driver or Cancel to retain the current driver.

Macrium Reflect Rescue Media files can be stored on a different volume, this tab allows for selection of the preferred volume. Select a volume by clicking the check box and then Click OK. Rescue media files will now be stored on that volume, any existing Macrium Reflect rescue media files from previous builds will be moved to a newly selected volume.
Note: This option is not available in Windows XPUSB Flash Drive Formatting

The following partition is required on the USB flash drive for booting the Macrium Reflect rescue media: Boot__________________ Type__________________ Min*Partition*Size_________________ Multi-Boot MBR / UEFI FAT32 1.2 x Size of Rescue Media PE files MBR Only FAT32 or NTFS 1.2 x Size of Rescue Media PE files
The Rescue Media PE files vary in size dependant on PE/RE version. 1GB will be sufficient for all PE and RE versions as of May 2018. If there is insufficient free space then the build may fail.
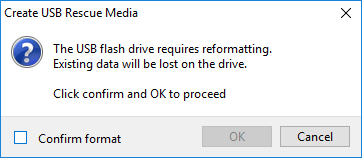
Rescue Media Builder will first attempt to non-destructively copy the PE/RE files to an existing partition, then non-destructively create a new partition if necessary. If this is not possible then you will be prompt to destructively format the drive.
The Flash drive is prepared and files copied according to the following steps...The flash media is first searched for a partition of sufficient size and the required file system type as defined in the above table. If found then the PE/RE files are copied to the Flash drive.
Note:
For Multi-Boot (MBR/UEFI) rescue media the suitable partition is determined in the following sequence:
The current 'Active' partition is checked for suitability.
If not found, the first suitable FAT32 partition is used. This partition is then marked 'Active'
For non Multi-Boot (MBR) rescue media the suitable partition is determined in the following sequence:
The current 'Active' partition is checked for suitability.
If not found, the first suitable FAT32 partition is used. This partition is then marked 'Active'
If not found, the first suitable NTFS partition is used. This partition is then marked 'Active'If no suitable partition/file system is found and the rescue media creation is Multi-Partition Aware then the flash drive is searched to locate unallocated space to create a 1GB FAT32 partition.
USB flash Rescue media is considered Multi-Partition Aware if the host OS is Windows 10 Release 1709 or later and the target Win PE/RE WIM is also Windows 10 Release 1709 or later . In all other cases only a single partition will be allowed on flash media.There can be a maximum of 4 primary partitions on the drive.
If a partition is successfully created and formatted then it is marked 'Active' and the PE/RE files are copied.If the rescue media creation is not Multi-Partition Aware or if the partition in step 2 cannot be created then Rescue Media Builder will prompt to format the Flash Drive. This is destructive and all existing data will be lost on the drive:
Partition and File System CreatedMulti-Partition
AwareType Size Y FAT32 1GB N FAT32 32GB or the maximum size of the flash drive
If a partition is successfully created and formatted then it is marked 'Active' and the PE/RE files are copied.
Click Next and add device drivers if required.
This dialog enables you to add drivers for any Network and Disk controllers that are unsupported in Windows PE.A device driver is a collection of files (also referred to as a driver package) and generally comprises of:
- The driver software, these files have a .SYS extension.
- The driver information, or INF, file which contains the installation instructions for the drivers, these files have a .INF extension.
- An optional security catalog that signs those drivers for operating systems that require signed drivers, commonly used on x64 operating systems, these files have a .CAT extension.
- One or more optional supporting software library files (Dynamic Link Library) that contain further code to support the driver software, these files have a .DLL extension.

Windows PE (WinPE) is packaged with a large collection of drivers but there are many devices that are not part of the WinPE driver package. If your device is not compatible then you must add its driver so WinPE recognizes it and communicates with your device.The wizard checks whether your device requires drivers adding to WinPE. It builds a list of devices in your computer that are either Hard Drive/RAID controllers, Network Interface Cards, USB controllers or USB hubs. For each of these devices it checks if:
- The device is supported by default in WinPE
- There is a compatible driver in the host operating system
- There is a compatible driver already present in the collection of drivers on previously created rescue media
The sequence below shows an example of adding a device driver to the Windows PE build:
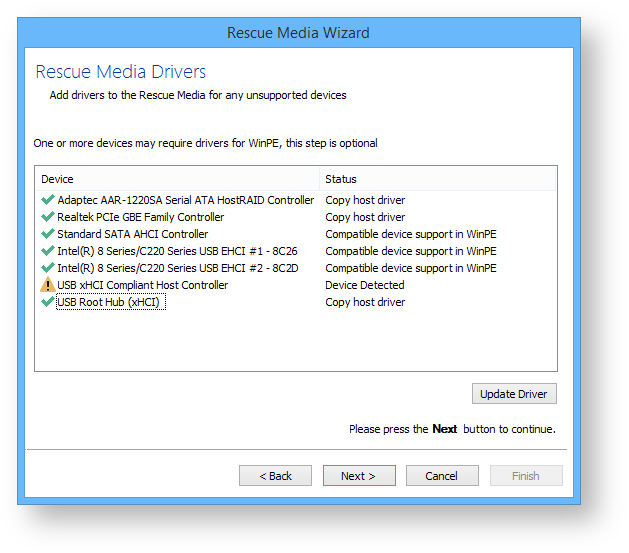
In the above example a driver is missing for a USB Controller. This is indicated by the icon next to the device description.
Note: You do not need to install missing drivers for devices that you do not intend using from WinPE.
Supported devices have a status of either:
- Device Support in WinPE
- Compatible Device Support in WinPE
- Copy Host Driver
- Driver already present in Drivers folder
You can find driver install packages in several places. Most manufacturers create a driver folder on the hard drive of a new PC, often named after the manufacturer. If this is not present, you can download drivers from the device or PC vendor's website. For older PCs, manufacturers of devices and motherboards included driver CDs in the packaging, however, these may not be the latest.Click the 'Update Driver' button to search for a compatible driver.
This presents a wizard. This wizard is straightforward to use, the first page prompts you for a folder to scan for drivers and whether you want to include all sub-folders.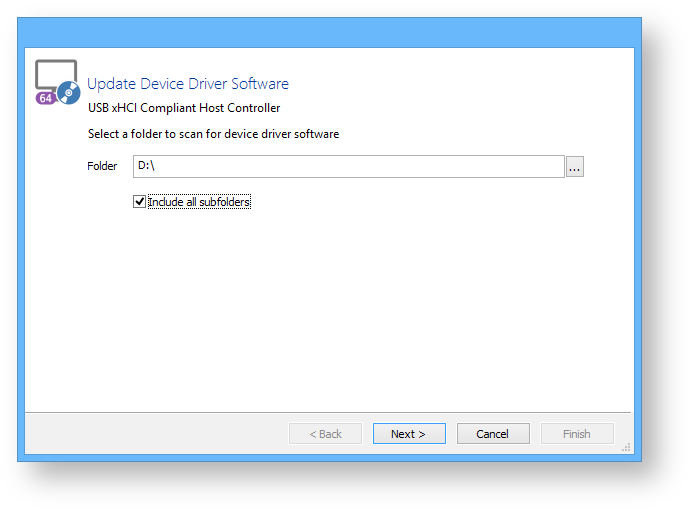
A compatible driver is found. Select it and click Next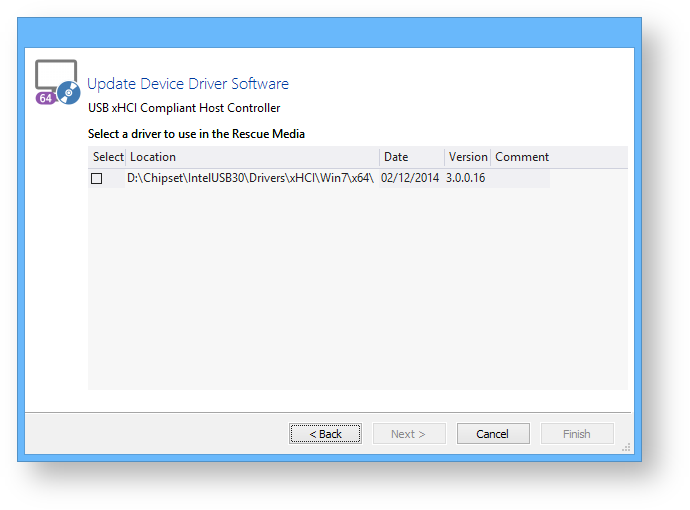
The device now has a green tick next to it to indicate compatibility with Windows PE

Click Next. to prepare and build the Windows PE image
Note: If you have already built the Windows PE image for this rescue media then the wizard will skip this step and advance to the Burn page
Option Description PE Architecture Either 32 bit or 64 Bit. The default option is selected to match the architecture of the host Windows OS. Include optional components Select this option to add BitLocker Encryption and iSCSI support to the rescue media. Please note that adding these components may several minutes to the creation process.
See Adding iSCSI support to Windows PE for more information on using iSCSI in Windows PEAutomatically unlock BitLocker encrypted drives Select this option to automatically unlock all BitLocker encrypted drives when Windows PE starts.
See Adding BitLocker support to Windows PE for more information on using Windows PE to access BitLocker encrypted drives.Default base WIM Use the standard Microsoft Windows PE base installation. Macrium Reflect executables will be added to this to crate the rescue media, Custom Base WIM Use your own customized WIM for the rescue media. This is an advanced topic not covered in this help. Click Next to begin the WIM build process. If necessary, files will automatically be downloaded from Microsoft to complete the build process.
You can also select the PE Components .zip file by clicking the 'Browse' button in the download dialog. The PE .zip file can be downloaded by using the Reflect download agent 'ReflectDL.exe'.
See Installing anInstalling and updating Macrium Reflect offlined updating Macrium Reflect offline for more information on downloading the PE components separately.
A detailed log of the build process is saved to: 'C:\ProgramData\Macrium\waik\waiklog.txt'Once complete you can choose where to burn the media
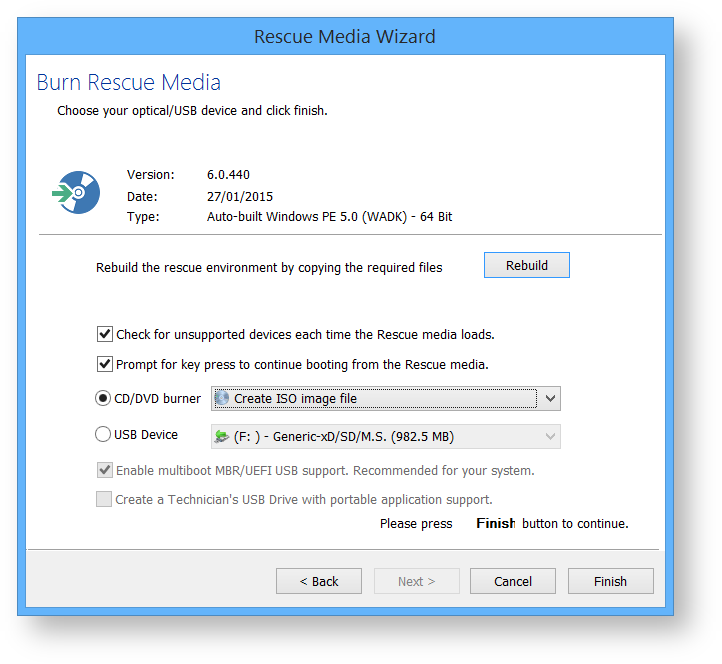
Option ________________ Description Rebuild Click this button to advance to the 'Prepare Windows PE image' wizard page to rebuild the Windows Image (WIM).
Note: If updates are available for your rescue media then you will receive a message box prompting you to rebuild.
Check for unsupported devices Select this option and Windows PE will prompt to add drivers for unsupported Network Interface and Disk controllers when started. Prompt for key press Select this option to enable the 'Press any key to boot from CD or DVD...' prompt when your PC starts. This is useful if you want to bypass Windows PE and boot into your host Windows OS. CD/DVD burner Select this option to choose a CD/DVD device that you are using to create your rescue media.
To save the rescue media to an .ISO image file for burning with any burning software. Click the drop-down list of burners and select 'Create an ISO image file':
USB Device Select this option to save your rescue media to a bootable USB stick or external hard drive. Enable multiboot MBR/UEFI Only applies if you are saving your rescue media to a USB device. This option enables the USB device to boot both legacy MBR and GPT/UEFI for modern motherboards. Please consult your motherboard user manual for information on choosing these boot options at PC startup.
Note: CD/DVD media is always created multi-boot MBR/UEFITechnicians USB Applies to Macrium Reflect Technicians license keys only. See Technicians portable application support for more information Click Finish.to create your rescue media
To complete the process, boot from your Rescue media to ensure it works correctly.
After Windows PE loads, Macrium Reflect runs. The Windows PE user interface for Macrium Reflect is identical to that of the main application and offers the same core functions.
If you are using USB media, you can make the Macrium Rescue Environment compatible with multiple computers:
- Use the Rescue media wizard to create a bootable USB rescue device on one computer.
- Repeat the process with each other computer in turn using the same USB device.
Once I have created rescue media, will it work on all my computers?
If the hardware for all your computers is supported by the default Windows PE driver set, then the answer is a simple yes. You can confirm this on the Rescue Media Wizard drivers page. If all the drivers listed have the status Device support in WinPE or Compatible device support in WinPE for each of your machines then you only need one rescue media.
If any of your machines require extra drivers, then you have three options:
- Create one piece of rescue media for each machine.
- Invoke the Create Rescue Media Wizard on each of your machines.
- Locate all the necessary drivers and progress to the Rescue Media Burn page before canceling.
- Copy the contents of
folder 'C:\boot\macrium\drivers' from each machine to one machine. - Burn a Rescue CD on that machine.
- Locate all the necessary drivers and progress to the Rescue Media Burn page before canceling.
- Using the Rescue media wizard, create a bootable USB stick, inserting the same device on each machine in turn.
Note: Options 2 and 3 only work if all your machines are configured to use the same version of PE with the same architecture (i.e. they are all 32-bit or all 64-bit).
If my rescue media refuses to boot, what should I do?
Verify your CD
Try as many of the following steps as possible:
- Try booting the CD on a 2nd PC.
If it boots, this indicates a configuration or hardware issue with your PC. Please see Verifying your PC later in this article. - Try a different brand of CD media.
We have found that CD recordable media is of variable quality. Often, using different media will resolve your issue. - Try creating the rescue media on a 2nd PC.
If Reflect is installed on the 2nd PC, please try creating rescue media there.
Alternatively, following the same CD creation steps as before, select Create ISO image file on the last page of the wizard. Transfer this to the 2nd PC and us a third party utility such as ImgBurn to burn the CD.
In each case, try booting the 1st PC with the new CD.
Verify your PC.
To boot rescue media from CD, your BIOS or UEFI firmware must be correctly configured and have hardware suitable for booting. Please try as many of the following steps as possible to diagnose this.
Note that there is no standard for motherboard firmware configuration, so our instructions are necessarily non-specific. Please consult your motherboard manual for details relevant to your PC.
- Try booting a Microsoft Windows install CD.
If the boot fails, this is indicative the your hardware is incorrectly configured. Please continue through this list for further diagnosis. - Invoke your BIOS/UEFI boot menu.

Boot menus vary in appearance and are invoked in different ways. You may need to refer to your motherboard manual to find the key combination to access this. Sometimes, this is displayed on the screen and is usually a key such as DEL, F8, F11, F12, F2 etc.
Please note that on UEFI/BIOS dual systems, you may be given the option to boot UEFI or not for each device. Please boot the type matching your installed OS. There are a few possible outcomes:- You are able to boot your rescue media in this manner, but not without performing this step. In this case, please see the next step in this section.
- You are unable to boot your rescue media having seen the hardware in the menu. In this case, you may wish to try the Verify CD steps above. If these do not rectify the issue, your hardware may not support booting Windows PE (you can also try this with the Windows Install CD to verify). In this case, please try an alternative rescue media format such as USB, or attach a different CD/DVD drive to the system.
- You are unable to see the hardware in your list. In this case your firmware has not recognised the device and it is not supported for booting.
- You are able to boot your rescue media in this manner, but not without performing this step. In this case, please see the next step in this section.
- Change the motherboard boot order.
Please enter your BIOS or UEFI firmware setup utility and navigate to the "boot order" or "boot menu" equivalent screen. Please ensure CD/DVD booting has a higher priority than your hard disk, which may be labelled ATAPI, SATA, SCSI or various other labels depending on your system. Please press F10, or your equivalent for "save and exit" to reboot the system with the new priority.
Please note that some UEFI firmware may not have boot priorities for removable media, or booting from removable media may be a configurable option that you must enable. - Create a USB rescue stick.
Follows the same steps as used when creating a CD, selecting instead "USB media" on the last page. If this works and your have verified your CD, it is indicative that your hardware cannot boot a CD. However, a usb stick, is just as functional as a CD, so we recommend you use this as your rescue device. - Confirm that the CPU architecture of the PE media is compatible with your system
For BIOS/MBR systems, in general, a PC with boot either a 32 and 64bit PE.
For EFI systems, the PE architecture must match the system type. A 32bit EFI CD will only boot on 32bit EFI systems and visa versa. Apart from a few tablet devices, all EFI systems are 64bit only.
What to expect when booting rescue media.
- The PE 3.1 environment is based on (a cutdown version of) Windows 7 and so boots in a similar fashion.
- The PE 4.0 environment is based on Windows 8 and so boots in a similar fashion.
- The PE 5.1 environment is based on Windows 8 and so boots in a similar fashion.