This article describes the steps involved to setup a 'one-click' system restore. Using Macrium Reflect you can automatically and easily return a Windows PC to a previously imaged system recovery point.
- System restore is completed without any user interaction during the restore process.
- Using Rapid Delta Restore (RDR) recovery is fast!
- BitLocker encrypted drives can be restored without requiring re-encryption after restore.
- The restore can be password protected to prevent accidental or unauthorised recovery.
Add the Macrium recovery boot menu
The first step is to add the Macrium boot menu. Take 'Other Tasks' > 'Add Recovery Boot Menu' in Macrium reflect and follow the instructions here: Adding a Boot Menu option for system Image recovery.
Without a boot menu you can still automatically restore by booting into optical rescue media or an external USB drive.
.
Create an image of drive C:
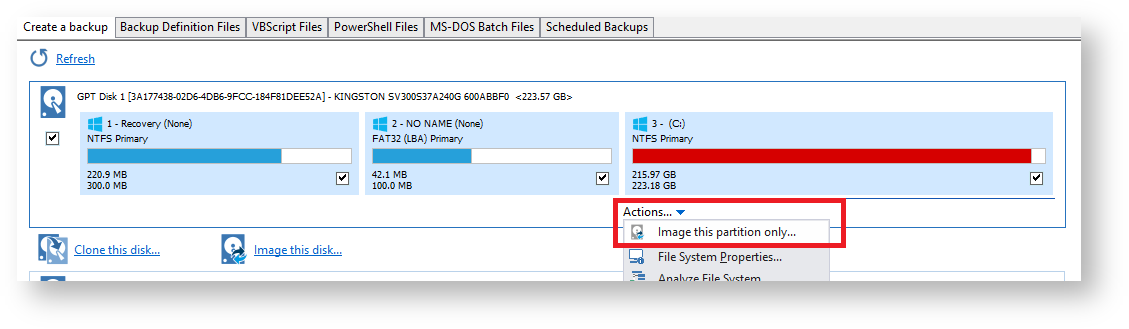
- Start Macrium Reflect, select 'Image this partition only...' for drive C.
- Choose a location that will be accessible when the recovery media boots, this could be a spare partition on an internal drive or an external USB disk or flash drive.
In this example we'll choose drive 'F:\', an internal partition.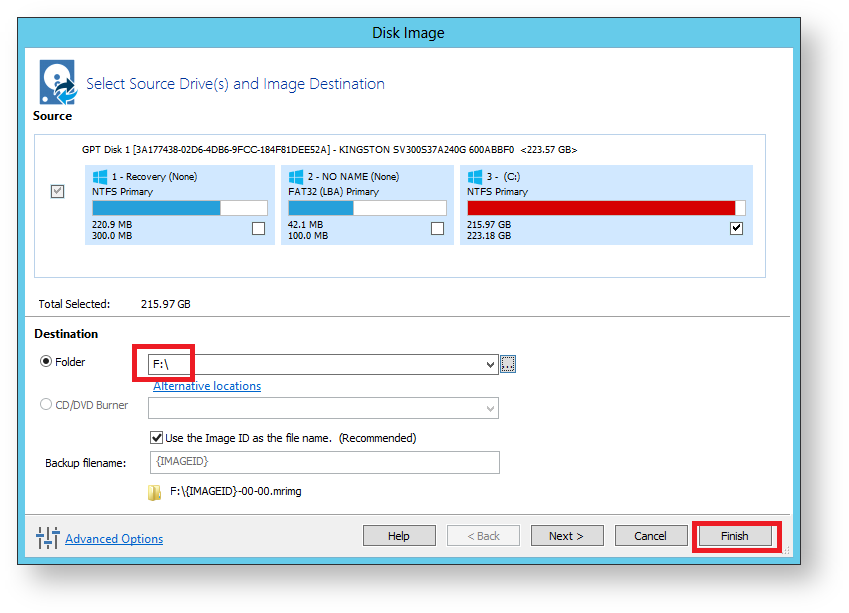

Prepare the auto restore XML file
Once the image completes we can prepare the xml file to automatically restore the image. To do this we need to step through the restore wizard but we aren't going to start the restore.
Start Macrium Reflect, click the 'Restore' tab, select the image created above and click the 'Restore Image' link.

Launch the 'Auto Restore' Dialog.
To launch this dialog press the 'Ctrl + Shift + S' together in the last page of the restore Wizard. This dialog will prompt for options to automatically restore the selected image file at a later time using the Windows PE rescue media. When 'OK' is clicked a restore definition xml file will be saved. Restore this image file: This is the default operation. The image file selected will be used as the restore source. Restore the latest matching image in the same folder: The image folder will be searched for any image files that contain the partitions being restored. The latest backup date is chosen as the restore source. Match target disk on unique identifier: This is the default operation. The unique disk id is used to ensure that the correct disk is restored to. Match target disk on disk number if unique id is not found: This option will not fail the restore if the target unique disk id cannot be found. In this case the disk with the same disk number will be chosen. Use with caution as Windows PE can enumerate disks in a different sequence and cause the wrong disk to be restored to, however, this won't be an issue if your system has only one local disk. Choose drive: Select from a list of local drives to save the restore definition file. The file will be saved in the root folder of the chosen drive and will be named 'macrium_restore.xml' Choose a file name and location: If selected, a file 'save As' dialog will be shown when the 'OK' button on this dialog is clicked. This enables saving the restore definition file to any file name and to any folder.
Local drives are scanned (from A to Z) for a restore definition 'macrium_restore.xml' file in each drive root folder. Macrium Reflect will use the first restore definition found. This can be any local drive, including USB flash drives or optical media. The restore definition contains instructions to locate the image file to restore from and the target disk to restore to. It is imperative that the correct image file is restored to the intended disk. To ensure that there are no nasty surprises after restoring, Macrium Reflect will uses unique disk identifiers and sector offsets to match the source and target of the restore. The default behaviour is to read the image file specified in the <file_name> xml node. However, It's possible that Windows PE has assigned different drive letters to local drives, in this case the following procedure is followed. All local drives are scanned for a 'Marker' file that is created when the restore definition is saved. This Marker file has the following file name format: 'Macrium_restore_{GUID}.txt', where the GUID (Globally Unique Identifier) is retrieved from the '<search node>' in the restore xml. If no Marker file is found or is not specified in the xml then all local drive are scanned (from A to Z) to locate any images in the folder specified by the '<file_name>' xml node that contain images to restore. The default behaviour is to read the specified image file in the folder in the '<image_file>' xml node. However, if 'Restore the latest matching image in the same folder' is selected in the Auto Restore dialog then the following procedure is followed: xml attribute find_recent="Y" is added to the <file_name> xml node. e.g, In this case Disk identifier 3A177438-02D6-4DB6-9FCC-184F81DEE52A and partiton number 1 with start sector 2048 and end sector 616447 The default behaviour is to select the target disk by matching the unique disk identifier specified in the <target_disk> xml node. However, if 'Match target disk number if unique id not found' is selected in the Auto Restore dialog then the following procedure is followed: xml attribute number_fallback="Y" is added to the <target_disk> xml node. The restore target disk is matched on disk number if a disk cannot be matched using the unique identifier. 

Option Description Password: Enter a password to protect against accidental or unauthorised running of this restore. Source Image File: Target Disk Selection: Restore xml file location
Set the restore xml file as 'Read Only': At the end of an auto restore the restore definition is automatically deleted. Setting the definition as 'Read Only' prevents deletion and enables re-running of the same restore each time Windows PE starts.How auto restore works
Locating the source image file folder
<search guid="{0D6B46C4-A5ED-4578-A9C0-5539B0AB94A0}">Y</search>

<file_name>D:\backups\auto_restore\4E855CB463979BC9-01-01.mrimg</file_name>
If the marker file isn't found in the path specified in the <file_name> xml node then all local drives are searched for the marker file in the same sub folder. If the marker file is found then that folder will be searched for the image file to restore. Locating the correct source image file

<file_name find_recent="Y">D:\backups\auto_restore\4E855CB463979BC9-01-01.mrimg</file_name>
All matching backup sets are loaded in the image file folder and the most recent backup date is selected and used for the restore. A matching backup set has the same disk and partitions specified in the restore definition file.<restore_definition>
<properties>
<source_disk id="3A177438-02D6-4DB6-9FCC-184F81DEE52A">1</source_disk>
</properties>
<operation id="1">
<type>copy</type>
<copy>
<source>
<partition start_sector="2048" end_sector="616447">1</partition>
</source>
</copy>
</operation>
</restore_definition>
A matching image file contains the same disk identifier and partiton start and end sectors as well as partiton number. Locating the restore target disk

<target_disk id="3A177438-02D6-4DB6-9FCC-184F81DEE52A" number_fallback="Y">1</target_disk>
That's it! Now whenever you take the Macrium System Recovery boot menu option your system will be automatically restored using the image created above.
